Create Password protected PDF using iTextsharp
Hi,In this article i would like to explain the procedure of creating password protected pdf using Itextsharp in asp.net and c#.Not only creating a pdf but also sending the pdf automatically via Email to the required user.

What are the Features :
1.Simple code to generate dynamic PDF.
2.Creating Password Protected PDF using iTextSharp
3.Auto Email sending Option with attached PDF to the user.

Let's start the procedure
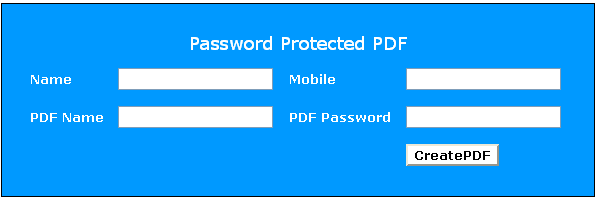
First We need to create a Design page,Add the following HTML code in Default.aspx page
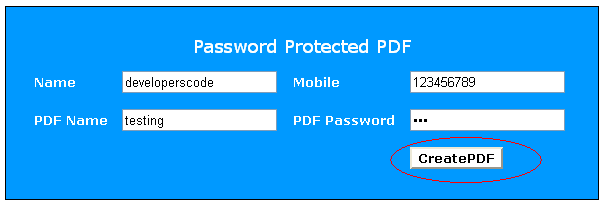
Next open the Default.aspx.cs page and write the following code in the button event
protected void btnCreatePDF_Click(object sender, EventArgs e)
    {
        string path = Server.MapPath("~/");
        string fileName =txtPDFName.Text + ".pdf";
        string MFileName = string.Empty;
        object TargetFile = path + fileName;
        //Bind PDF
        BindData(path, fileName);

        iTextSharp.text.pdf.PdfReader reader = new iTextSharp.text.pdf.PdfReader(TargetFile.ToString());
        MFileName = TargetFile.ToString();
        MFileName = MFileName.Insert(ModifiedFileName.Length - 4, "test");

        iTextSharp.text.pdf.PdfEncryptor.Encrypt(reader, new FileStream(MFileName, FileMode.Append), iTextSharp.text.pdf.PdfWriter.STRENGTH128BITS, txtPDFPwd.Text, "", iTextSharp.text.pdf.PdfWriter.AllowPrinting);
        if (File.Exists(TargetFile.ToString()))
            File.Delete(TargetFile.ToString());
        //Send PDF
        SendMail(FileName);

    }
In the above we have declared two methods
The first method is BindData() with parameters path and file name
In this method, we are binding the data to pdf file.Write the following code to bind the data in PDF file
private void BindData(string path, string fileName)
    {
        try
        {
            Document doc = new Document(PageSize.A4, 3, 3, 3, 3);
            PdfWriter.GetInstance(doc, new FileStream(path + fileName, FileMode.Create));
            doc.Open();
            //Title
            PdfPTable Titletab = new PdfPTable(1);
            PdfPCell Titlecell = new PdfPCell(new Phrase("Password Protected PDF "));
            //Titlecell.Colspan = 4;
            Titlecell.HorizontalAlignment = 1; //0=Left, 1=Centre, 2=Right
            Titletab.AddCell(Titlecell);

            //Main Table
            PdfPTable Maintab = new PdfPTable(4);
            PdfPCell Maincell3 = new PdfPCell();
            //Row 1
            Maintab.AddCell("Name : ");
            Maintab.AddCell(txtName.Text);
            Maintab.AddCell("Mobile :");
            Maintab.AddCell(txtMobile.Text);

            doc.Add(Titletab);
            doc.Add(Maintab);
            doc.Close();
        }
        catch (Exception ex)
        {
            throw ex;
        }
    }
The second method is Email functionality that is SendMail() with parameter File Name.the purpose of this method is to send email to the user with newly created PDF file.
For clear explanation about Email functionality
Check this articles
private void SendMail(string path)
    {
        try
        {
            string MailMessage = "Testing";

            System.Net.Mail.MailMessage msg = new System.Net.Mail.MailMessage();

            msg.From = new MailAddress("abc@gmail.com");

            msg.To.Add("user@yahoo.com");//Text Box for To Address

            msg.Subject = "Student Form"; //Text Box for subject


            msg.IsBodyHtml = true;

            msg.Body = MailMessage;//Text Box for body

            msg.Priority = MailPriority.High;

            msg.Attachments.Add(new Attachment(path));

            System.Net.Mail.SmtpClient client = new System.Net.Mail.SmtpClient("smtp.gmail.com", 587);

            client.UseDefaultCredentials = false;

            client.Credentials = new System.Net.NetworkCredential("username", "password");


            client.Port = 587;

            client.Host = "smtp.gmail.com";

            client.EnableSsl = true;

            object userstate = msg;

            client.Send(msg);

            lblstatus.Text="Mail successfully sent";

        }
        catch (Exception ex)
        {
            throw ex;
        }
    }
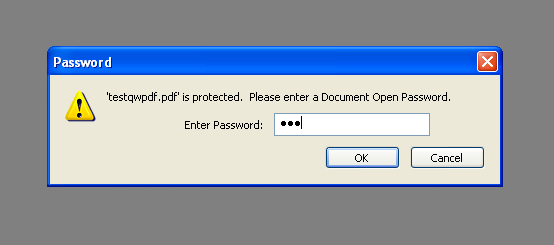
That's it.Now you can check the output.Happy coding
Labels: .Net Tutorials, Aspnet, C#

1 Comments:
You can also create password protected pdf files by using Aspose.PDF for .NET. You can also user java library of Aspose for this purpose.
Post a Comment
Subscribe to Post Comments [Atom]
<< Home